

Move over, kale—cauliflower is taking the spotlight, and for all the right reasons.
Whether you’re on a low-carb journey, looking to add more plant-based meals to your diet, or just love trying TikTok-famous food trends, cauliflower recipes are everywhere right now.
From crispy snacks to hearty mains, this humble veggie has proven it can do it all.
But is the hype really worth it?
Short answer: absolutely.
In this post, we’re diving deep into why cauliflower recipes have gone viral, what makes them so irresistible, and how you can create mouthwatering cauliflower dishes at home—starting with a show-stopping Cauliflower Shawarma Bowl that’s bursting with flavor.
1. Versatility in the Kitchen
One of the biggest reasons cauliflower recipes have taken the food world by storm is the incredible versatility this vegetable offers.
Cauliflower isn’t just a side dish anymore—it’s a total culinary chameleon.
You can steam it, roast it, mash it, rice it, grill it, or even turn it into a creamy sauce.
It adapts to almost any cooking method and cuisine, making it a must-have ingredient for creative home cooks and professional chefs alike.
🌿 It Takes on Flavors Like a Pro
Cauliflower has a naturally mild, slightly nutty flavor that acts as a perfect blank canvas for spices, sauces, and herbs.
Want it smoky and spicy?
Add chipotle and paprika.
Craving something aromatic and earthy?
Use turmeric, cumin, and coriander.
From Middle Eastern-inspired cauliflower recipes to Asian-style stir-fries, you can customize cauliflower to suit whatever flavor profile you’re craving.
🍝 It’s a Low-Carb Alternative to High-Carb Favorites
One of the biggest game-changers has been using cauliflower as a substitute for high-carb staples like rice, potatoes, and flour-based crusts.
Some of the most popular cauliflower recipes today include:
- Cauliflower Rice: A grain-free alternative to white rice, perfect for stir-fries, burrito bowls, and side dishes.
- Cauliflower Mash: Creamy and comforting like mashed potatoes, but lighter and packed with nutrients.
- Cauliflower Crust Pizza: A gluten-free, low-carb crust that actually holds together and tastes amazing.
- Cauliflower Gnocchi: Thanks to brands like Trader Joe’s, this version of gnocchi made from cauliflower has become a cult favorite.
- Cauliflower Tortillas: Soft, foldable, and perfect for tacos or wraps without the flour.
🍽️ It Works in Every Meal—From Breakfast to Dinner
Cauliflower isn’t just for dinner.
More and more people are including this powerhouse veggie in meals throughout the day.
Some clever cauliflower recipes even incorporate it into smoothies or use it as a base for veggie-packed breakfast hash.
Here are just a few ideas to inspire you:
- Breakfast: Cauliflower and egg muffins with spinach and herbs
- Lunch: Roasted cauliflower salad with lemon-tahini dressing
- Dinner: Cauliflower tikka masala with basmati rice or naan
- Snack: Crispy cauliflower bites with buffalo sauce or vegan ranch
- Appetizer: Cauliflower “wings” with garlic parmesan or honey sriracha
👩🍳 It’s a Meal Prep MVP
If you’re into meal prepping, cauliflower is your best friend.
Roasted cauliflower lasts up to five days in the fridge and can be tossed into everything from Buddha bowls to wraps.
You can even freeze cauliflower rice or pre-made cauliflower crusts for quick weekday meals.
It’s one of those rare ingredients that saves you time, supports your health goals, and keeps things exciting in the kitchen.
The Recipe That Proves the Point: Cauliflower Shawarma Bowls
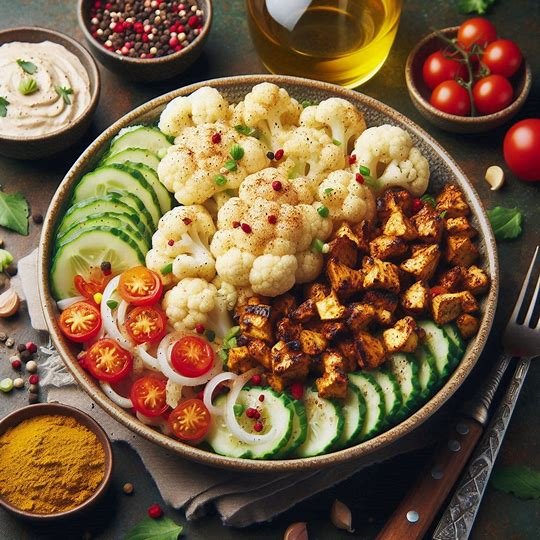
Let’s talk about one of the most viral and flavor-packed cauliflower recipes on the internet right now: Cauliflower Shawarma Bowls.
Inspired by Middle Eastern flavors and packed with nourishing ingredients, this plant-based bowl is proof that cauliflower deserves the spotlight.
🌯 Cauliflower Shawarma Bowls
Ingredients:
For the Shawarma-Spiced Cauliflower:
- 1 large head of cauliflower, cut into florets
- 2 tbsp olive oil
- 1 tsp smoked paprika
- 1 tsp cumin
- 1 tsp turmeric
- 1/2 tsp garlic powder
- 1/2 tsp ground coriander
- Salt and pepper, to taste
- Juice of 1/2 lemon
For the Bowl Base:
- 1 cup cooked quinoa or brown rice
- 1 cup chopped cucumbers
- 1/2 cup cherry tomatoes, halved
- 1/2 red onion, thinly sliced
- 1/4 cup chopped fresh parsley
- 1/4 cup hummus or tahini sauce
- Optional: Pickled red cabbage or olives
Instructions:
- Preheat the oven to 425°F (220°C).
- In a large bowl, toss the cauliflower florets with olive oil, lemon juice, and all spices until well-coated.
- Spread on a parchment-lined baking sheet and roast for 25–30 minutes, flipping halfway, until golden and crispy on the edges.
- While cauliflower roasts, prep your bowl ingredients: cook grains, chop veggies, and make or prep your sauce.
- Assemble your bowl by layering quinoa or rice, fresh veggies, roasted cauliflower, and a generous drizzle of tahini or dollop of hummus.
- Garnish with parsley, and enjoy warm or chilled.
✅ Pro Tip: Meal prep the cauliflower and grains ahead of time for quick, nourishing lunches throughout the week.
More Viral Cauliflower Recipes to Try
Looking to explore more viral cauliflower recipes? Here are a few that have been making waves:
🔥 Cauliflower Buffalo Bites (Crispy, Spicy & Addictive)

When it comes to viral cauliflower recipes, few have made a bigger splash than Cauliflower Buffalo Bites.
They’re the ultimate plant-based crowd-pleaser—crispy on the outside, tender on the inside, and coated in that iconic, fiery buffalo sauce we all crave.
Whether you’re prepping for game day, hosting friends, or just need a healthier snack fix, this recipe checks every box.
Bonus: it’s totally meat-free, easy to make gluten-free, and can be air-fried, baked, or even pan-fried.
🛒 Ingredients
For the Battered Cauliflower:
- 1 large head of cauliflower, chopped into bite-sized florets
- 3/4 cup all-purpose flour (or gluten-free flour blend)
- 1 tsp garlic powder
- 1 tsp onion powder
- 1/2 tsp smoked paprika
- 1/2 tsp salt
- 1/4 tsp black pepper
- 3/4 cup water or unsweetened plant-based milk (like almond or oat)
For the Buffalo Sauce:
- 1/2 cup hot sauce (like Frank’s RedHot or your favorite brand)
- 2 tbsp unsalted butter (or vegan butter)
- 1 tbsp maple syrup or honey (optional, for a touch of sweetness)
- 1/2 tsp garlic powder
Optional for Serving:
- Celery sticks
- Carrot sticks
- Vegan or regular ranch or blue cheese dressing
👩🍳 Instructions:
Step 1: Prep the Oven
Preheat your oven to 425°F (220°C). Line a large baking sheet with parchment paper or a silicone baking mat.
Step 2: Make the Batter
In a large mixing bowl, whisk together the flour, garlic powder, onion powder, smoked paprika, salt, and pepper.
Slowly add water or plant-based milk and whisk until smooth and lump-free.
Step 3: Coat the Cauliflower
Dip each cauliflower floret into the batter, allowing any excess to drip off.
Arrange them in a single layer on the baking sheet, leaving space between each piece.
Step 4: Bake Until Golden
Bake for 20–25 minutes, flipping halfway through, until the cauliflower is lightly golden and crisp on the outside.
Step 5: Toss in Buffalo Sauce
While the cauliflower is baking, combine hot sauce, butter, maple syrup (if using), and garlic powder in a small saucepan over low heat.
Stir until the butter is melted and the sauce is warm and smooth.
Step 6: Coat and Crisp Again
Remove cauliflower from the oven and gently toss in the buffalo sauce (you can use a large mixing bowl or brush the sauce on).
Return them to the baking sheet and bake for another 10–15 minutes until crispy and slightly caramelized.
Step 7: Serve Hot and Fresh
Serve immediately with carrot and celery sticks, and your choice of dipping sauce.
🔥 Pro Tip: Want ultra-crispy bites? Try air frying them at 400°F for 12–15 minutes, then toss in sauce and air fry again for 5 more minutes.
🧡 Why You’ll Love This Cauliflower Recipe
- ✅ Super crispy without deep frying
- ✅ Fully plant-based and can be made gluten-free
- ✅ A healthier twist on your favorite comfort food
- ✅ Perfect for parties, snacking, or meal prep
- ✅ TikTok and Instagram-worthy!
Make It a Meal
These Cauliflower Buffalo Bites aren’t just for snacking—they make an amazing centerpiece in wraps, grain bowls, or salads.
Try one of these ideas:
Buffalo Salad: Toss into a green salad with crumbled feta and crispy chickpeas.
Buffalo Cauliflower Wrap: Add bites to a tortilla with lettuce, avocado, and ranch.
Buffalo Bowl: Serve over quinoa with slaw, cucumbers, and creamy dressing.
🍕 Cauliflower Pizza Crust (Crispy, Cheesy & Low-Carb)

If you’re cutting back on carbs, gluten, or just trying to sneak more veggies into your meals, Cauliflower Pizza Crust is a total game changer.
It’s crispy on the outside, tender in the middle, and strong enough to hold your favorite toppings—yes, even extra cheese.
While some cauliflower crusts can turn out soggy or fall apart, this recipe solves all that with the perfect combo of cheese, eggs, and seasonings to create a crust that’s both flavorful and functional.
🛒 Ingredients:
For the Crust:
- 1 large head of cauliflower (or about 4 cups cauliflower rice)
- 1/2 cup shredded mozzarella cheese
- 1/4 cup grated Parmesan cheese (or nutritional yeast for dairy-free option)
- 1 large egg
- 1/2 tsp garlic powder
- 1/2 tsp Italian seasoning
- 1/4 tsp salt
- Optional: a pinch of crushed red pepper flakes or dried basil for extra flavor
For the Toppings (customizable):
- 1/4 cup marinara or pizza sauce (look for low-sugar options)
- 1/2 cup shredded mozzarella cheese
- Fresh basil, cherry tomatoes, mushrooms, bell peppers, olives, or your favorite toppings
👩🍳 Instructions:
Step 1: Prep the Cauliflower
- Remove leaves and stem from the cauliflower. Chop into florets and pulse in a food processor until it resembles rice (you can also use store-bought riced cauliflower to save time).
- Transfer the riced cauliflower to a microwave-safe bowl and microwave for 5–6 minutes until soft.
- Let cool for a few minutes, then place in a clean kitchen towel or cheesecloth. Squeeze out as much moisture as possible—this step is key to avoiding a soggy crust!
💡 Tip: You want the cauliflower to be dry like dough. If it’s too wet, your crust won’t crisp up properly.
Step 2: Make the Crust Mixture
- In a large bowl, mix the drained cauliflower with shredded mozzarella, Parmesan, egg, garlic powder, Italian seasoning, and salt. Stir until it forms a sticky dough.
Step 3: Shape the Crust
- Preheat your oven to 425°F (220°C).
- Line a baking sheet or pizza stone with parchment paper and lightly grease it.
- Transfer the cauliflower mixture to the parchment and use your hands or a spatula to press it into a round crust, about 1/4 inch thick.
- Bake for 20–25 minutes, or until golden brown and crisp around the edges.
Step 4: Add Toppings & Bake Again
- Remove from the oven and carefully add your sauce, cheese, and desired toppings.
- Return to the oven and bake for another 10–12 minutes, or until cheese is melted and bubbly.
Step 5: Slice & Serve
- Let the pizza cool for a couple of minutes before slicing—this helps the crust firm up.
- Garnish with fresh basil or crushed red pepper, and enjoy!
🍕 Why This Cauliflower Pizza Crust Works
- ✅ Crispy and holds together (no forks required!)
- ✅ Low-carb & keto-friendly
- ✅ Customizable for any diet—dairy-free, gluten-free, vegetarian
- ✅ Family and kid-approved
- ✅ Great for meal prep (crust can be frozen for later!)
Meal Prep & Storage Tips
- Make Ahead: Prepare the crust, bake it, and freeze it for up to 2 months. Add toppings and bake from frozen when ready to eat.
- Leftovers: Store slices in an airtight container in the fridge for 2–3 days. Reheat in the oven or air fryer for best texture.
Bonus Flavor Twists
Want to elevate your Cauliflower Pizza Crust even more? Try these fun variations:
🧄 Garlic Herb Crust: Mix minced garlic and fresh chopped herbs like rosemary or thyme into the dough.
🌿 Pesto Base: Swap marinara for basil pesto and top with cherry tomatoes and goat cheese.
🌶️ Spicy Crust: Add a pinch of cayenne pepper and red pepper flakes to the crust mixture.
🥦 Cauliflower Fried Rice (Low-Carb, Flavor-Packed & Better Than Takeout)
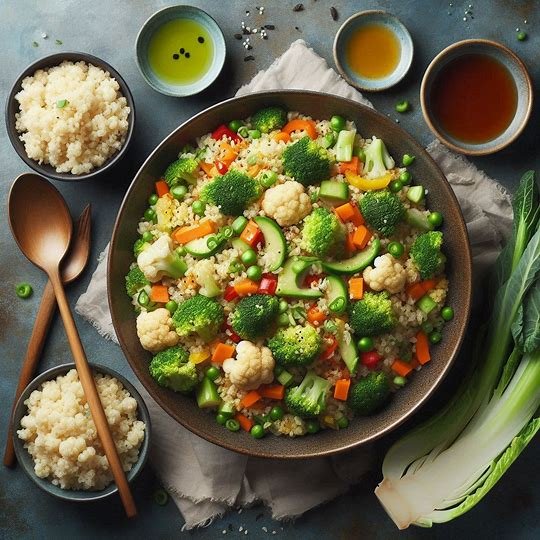
Craving takeout but want something lighter and veggie-forward? Cauliflower Fried Rice is your answer. This quick, low-carb dish delivers all the comfort and flavor of classic fried rice—with a healthy twist.
It’s packed with colorful veggies, savory aromatics, and just the right balance of soy and sesame.
Best of all?
It takes less than 30 minutes from start to finish and is endlessly customizable.
Whether you’re vegan, paleo, or just trying to eat more plants, this is one of those cauliflower recipes you’ll come back to again and again.
🛒 Ingredients:
Base:
- 1 medium head of cauliflower, riced (about 4 cups)
- 1 tbsp sesame oil (or avocado oil)
- 2 eggs, beaten (omit or sub tofu scramble for vegan version)
- 2 cloves garlic, minced
- 1/2 inch fresh ginger, grated
- 1 small onion, finely diced
Veggies:
- 1 cup frozen peas and carrots (or any veggie mix)
- 1/2 red bell pepper, finely diced
- 1/2 cup chopped green onions (scallions), divided
Sauce:
- 2–3 tbsp low-sodium soy sauce (or tamari for gluten-free)
- 1 tsp toasted sesame oil
- 1/2 tsp rice vinegar (optional, for tang)
- A pinch of red pepper flakes (optional, for heat)
Toppings (optional):
- Sesame seeds
- Extra green onions
- Sriracha or chili garlic sauce
- Crushed peanuts or cashews
👩🍳 Instructions:
Step 1: Rice the Cauliflower
- Chop the cauliflower into florets and pulse in a food processor until it resembles rice. Be careful not to over-process—stop while it still has texture.
- If using pre-riced cauliflower (fresh or frozen), you’re already a step ahead!
Step 2: Cook the Eggs (If Using)
- Heat 1/2 tbsp of sesame oil in a large skillet or wok over medium heat.
- Add the beaten eggs and scramble until fully cooked. Remove from pan and set aside.
Step 3: Sauté the Aromatics
- Add the remaining 1/2 tbsp sesame oil to the same pan. Sauté the onion, garlic, and ginger for 1–2 minutes until fragrant.
Step 4: Stir-Fry the Veggies
- Add in the peas, carrots, and bell peppers. Cook for 3–4 minutes until veggies are slightly tender but still vibrant.
Step 5: Add the Cauliflower Rice
- Stir in the riced cauliflower and increase heat to medium-high.
- Cook for 5–7 minutes, stirring often, until the cauliflower is tender but not mushy.
Step 6: Add Sauce & Eggs
- Pour the soy sauce, toasted sesame oil, and rice vinegar (if using) over the rice.
- Stir well to combine, then fold in the scrambled eggs and half of the green onions.
Step 7: Serve & Garnish
- Taste and adjust seasoning if needed—add more soy sauce or a dash of sriracha for heat.
- Serve hot, topped with sesame seeds, the rest of the green onions, and any other toppings you love.
🥢 Why You’ll Love This Cauliflower Fried Rice
- ✅ Ready in under 30 minutes
- ✅ Low-carb, gluten-free, and high in fiber
- ✅ Great for meal prep or quick weeknight dinners
- ✅ Totally customizable (add tofu, shrimp, or chicken!)
- ✅ One of the most satisfying cauliflower recipes out there!
💡 Variations to Try
- Spicy Kimchi Fried Rice: Stir in chopped kimchi and gochujang for Korean-inspired flavor.
- Thai Style: Add a squeeze of lime, chopped peanuts, and a drizzle of peanut sauce.
- Protein Boost: Mix in cubed tofu, tempeh, grilled chicken, or shrimp.
- Pineapple Fried Rice: Add chopped pineapple and cashews for a tropical spin.
Meal Prep & Storage Tips
- Make Ahead: Cook and store in airtight containers in the fridge for up to 4 days.
- Freeze-Friendly: Cauliflower fried rice freezes well for up to 2 months. Reheat on the stovetop with a splash of water to revive the texture.
🧡 Bonus Tip
If your cauliflower fried rice ever turns out too soft, try:
Avoiding over-stirring—let it sit to develop some crisp edges
Cooking uncovered so steam escapes
Using fresh riced cauliflower instead of frozen
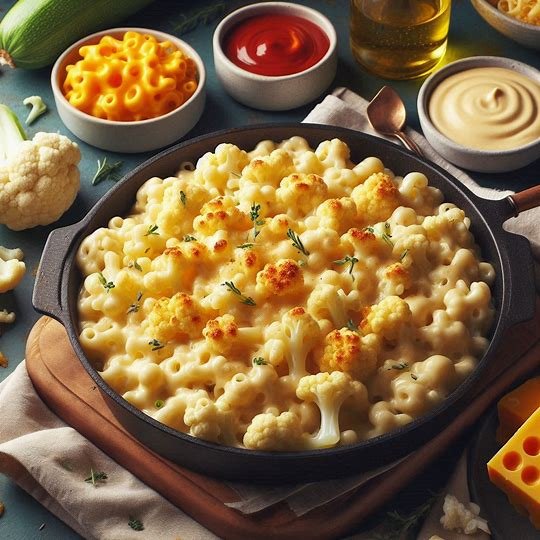
🧀 Cauliflower Mac and Cheese (Creamy, Cheesy & Low-Carb Comfort)
When it comes to comfort food, mac and cheese reigns supreme.
But what if you could enjoy all the creamy, cheesy goodness of traditional mac and cheese—without the heavy pasta or guilt?
Enter: Cauliflower Mac and Cheese.
This low-carb, keto-friendly twist on a classic swaps out pasta for tender cauliflower florets, smothered in a silky cheese sauce that’s every bit as indulgent.
It’s the kind of dish that satisfies picky eaters, carb counters, and comfort food lovers alike.
Whether you’re serving it as a side dish, a main course, or sneaking in more veggies for your family, this is one of those cauliflower recipes you’ll make again and again.
🛒 Ingredients:
For the Cauliflower:
- 1 large head of cauliflower, cut into bite-sized florets
- Salt, for boiling water
For the Cheese Sauce:
- 2 tbsp unsalted butter (or ghee for paleo version)
- 2 tbsp almond flour or regular flour (for thickening)
- 1 1/4 cups unsweetened almond milk (or any milk of choice)
- 1/2 tsp garlic powder
- 1/2 tsp onion powder
- 1/2 tsp mustard powder (optional, but adds depth)
- 1/2 tsp paprika or smoked paprika
- Salt and pepper, to taste
- 1 1/2 cups shredded sharp cheddar cheese
- 1/2 cup grated Parmesan cheese
- Optional: 1 tbsp cream cheese for extra richness
Optional Topping:
- 1/4 cup gluten-free breadcrumbs or crushed pork rinds (for keto)
- 1 tbsp melted butter
- Extra cheese for broiling
👩🍳 Instructions:
Step 1: Prepare the Cauliflower
- Bring a large pot of salted water to a boil.
- Add cauliflower florets and cook for 5–6 minutes until just fork-tender (not mushy).
- Drain well and set aside to dry completely—moisture is the enemy of a creamy sauce!
💡 Tip: After boiling, spread the cauliflower on a towel or paper towel-lined baking sheet and let it steam off for 5–10 minutes while you make the sauce.
Step 2: Make the Cheese Sauce
- In a large saucepan over medium heat, melt the butter.
- Whisk in the almond flour (or regular flour) to make a roux. Cook for 1–2 minutes until golden.
- Slowly pour in the milk while whisking constantly to avoid lumps.
- Add garlic powder, onion powder, paprika, mustard powder, salt, and pepper.
- Let the mixture simmer for 3–5 minutes, stirring frequently, until slightly thickened.
- Reduce heat to low and stir in the cheddar, Parmesan, and cream cheese (if using) until melted and velvety smooth.
🧀 Sauce Hack: Want it ultra-smooth and silky? Use an immersion blender to blend the sauce before adding the cheese!
Step 3: Combine & Heat
- Add the drained cauliflower to the cheese sauce and gently fold to coat all the florets.
- Simmer on low for 3–4 minutes until everything is heated through and bubbly.
Step 4: Optional Bake & Broil (For Golden Top)
- Preheat your oven to 400°F (200°C).
- Transfer the cauliflower mac and cheese to a greased baking dish.
- Mix breadcrumbs or crushed pork rinds with melted butter and sprinkle on top, along with extra shredded cheese.
- Bake for 10–12 minutes, then broil for 2–3 minutes until golden and bubbly.
🔥 Why You’ll Love This Cauliflower Mac and Cheese
- ✅ Comfort food made healthier
- ✅ Low-carb and keto-friendly
- ✅ Gluten-free and customizable
- ✅ Creamy, cheesy, and totally satisfying
- ✅ A must-try for fans of viral cauliflower recipes
💡 Customization Ideas
- Add Protein: Mix in cooked chicken, bacon bits, or shredded rotisserie chicken for a hearty main.
- Spicy Kick: Add a pinch of cayenne or a few dashes of hot sauce.
- Loaded Mac: Top with green onions, crumbled bacon, and extra cheese.
- Vegan Option: Use vegan butter, plant-based cheese, and unsweetened oat milk.
Meal Prep & Storage Tips
- Make Ahead: Prepare everything up to the baking step and store in the fridge for up to 2 days.
- Reheat: Warm leftovers in the oven or microwave. Add a splash of milk to loosen the sauce if needed.
- Freezer-Friendly: Freeze individual portions in airtight containers. Reheat in the oven until heated through.
Pairing Ideas
Serve your Cauliflower Mac and Cheese with:
Garlic bread (for those who aren’t low-carb!)
Grilled salmon or chicken
A fresh green salad
Roasted Brussels sprouts or broccoli
How to Make the Most of Cauliflower Recipes
- Roast it right: High heat = crispy edges and caramelized flavor. Don’t overcrowd the pan.
- Spice it up: Cauliflower is a blank slate, so don’t be shy with bold spices like curry, chipotle, harissa, or za’atar.
- Sauce is everything: A good drizzle of tahini, yogurt dressing, or spicy mayo can elevate any cauliflower dish.
Final Thoughts
Whether you’re chasing health goals, cutting back on meat, or just love bold and creative cooking, these cauliflower recipes are more than just a trend—they’re a lifestyle upgrade.
With endless ways to enjoy this adaptable veggie, there’s no reason not to lean into the hype.
So next time you’re meal planning, toss a head of cauliflower into your cart and give one of these viral recipes a try.
Start with the Cauliflower Shawarma Bowls and see why the internet can’t get enough.
📌 Save This Post for Later!
Loved these ideas? Bookmark this post or share it with a fellow food lover who needs more cauliflower magic in their life.
👉 Hungry for more?
Check out our Classic Chicken Pot Pie, But Make It Healthy (And Still Delicious) and subscribe for weekly recipe inspo!
As an Amazon Associate, I Earn From Qualifying Purchases.